")

Full Camera Control in AI Video Using One Prompt (Nano Banana Pro + Keoo AI)
Creating cinematic videos used to mean complex camera rigs, multiple takes, and expensive editing workflows. Today, full camera control in AI video using one prompt has completely changed the game.
With tools like Nano Banana Pro and Keoo AI, creators can generate consistent characters, multiple camera angles, and smooth cinematic storytelling, all from a single prompt and one base image.
This workflow lets you produce professional-looking AI videos with extreme long shots, close-ups, low angles, and high angles, without burning credits or spending hours on manual edits.
Whether you’re a YouTuber, filmmaker, or faceless content creator, this method makes cinematic AI video creation fast, affordable, and beginner-friendly.
What Does “Full Camera Control in AI Video” Mean?
Full camera control in AI video means you can define how each shot looks, just like a real film production. Instead of random outputs, the AI follows cinematic rules such as:
-
Extreme Long Shots (ELS)
-
Long Shots (LS)
-
Medium Shots (MS)
-
Close-Ups (CU)
-
Extreme Close-Ups (ECU)
-
Low-angle and High-angle shots
All of these can be generated from one prompt, while keeping the same character, clothing, props, lighting, and environment consistent across every frame.
This is exactly where Nano Banana Pro + Keoo AI shine.
Why Nano Banana Pro + Keoo AI Is a Game-Changer
Keoo AI (Q.AI) is an all-in-one creative platform that supports:
-
AI image generation
-
AI video generation
-
Sound effects and music
-
Lip sync
-
Content optimization for YouTube (keywords, thumbnails, SEO)
When paired with Nano Banana Pro, creators gain:
-
High-quality cinematic outputs (up to 2K)
-
Consistent characters across shots
-
Controlled camera angles
-
Lower credit usage compared to generating images one by one
This makes it perfect for faceless YouTube channels, cinematic storytelling, short films, reels, and AI movies.
Tool Setup in Keoo AI (Where to Start)
Inside Keoo AI, the workflow starts like this:
- Sign in → Dashboard
- Go to Idea Lab
- Click New Idea Lab
- Choose the Image Generation tab
- Select model Nano Banana Pro
- Set Landscape + 2K (as in your example)
- Upload your base image
- Paste the Method prompt and generate
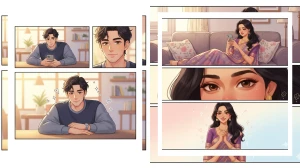
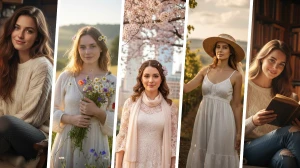
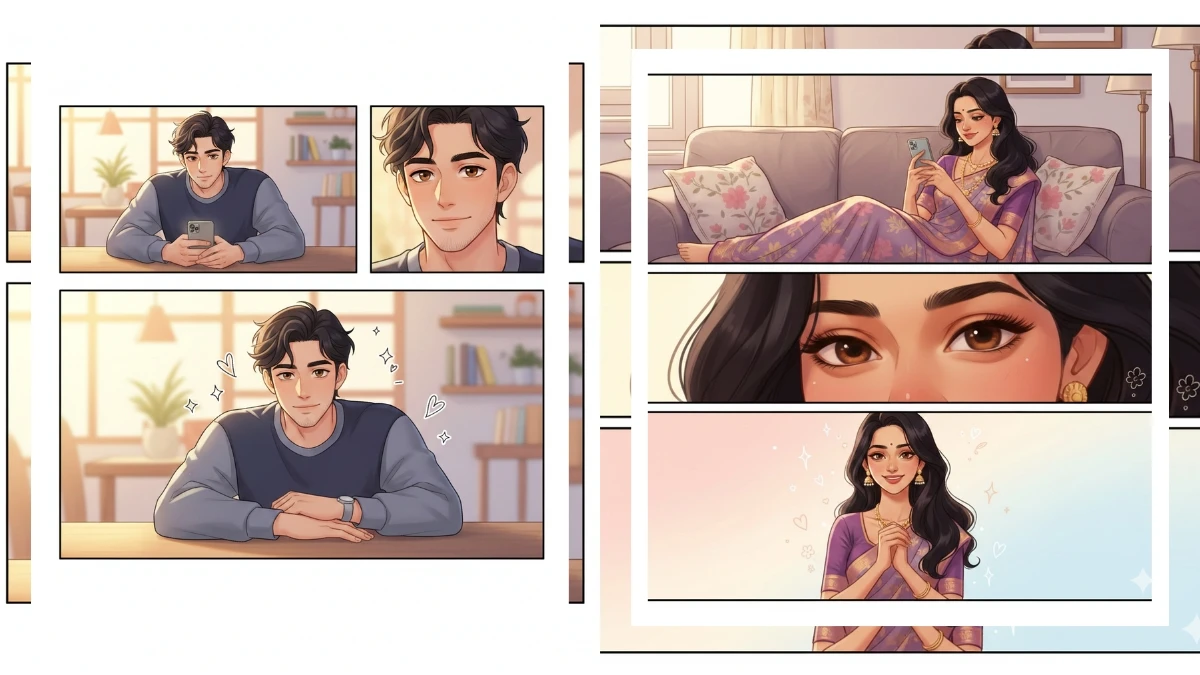
Method 1: Multiple Camera Angles Using a 3×3 Cinematic Grid
The first method focuses on camera coverage.
How it works
1. Upload one reference image
2. Use a structured prompt that tells the AI to:
- Analyze the subject and environment
- Create a 3×3 cinematic contact sheet
- Apply different camera shots to each grid cell
3. Maintain strict consistency:
- Same subject and clothing
- Same lighting and time of day
- Unified cinematic color grading
Each row represents a different shot category:
-
Row 1: Extreme Long Shot, Long Shot, Medium Long Shot
-
Row 2: Medium Shot, Medium Close-Up, Close-Up
-
Row 3: Extreme Close-Up, Low Angle, High Angle
Key Advantage
Instead of paying for 9 separate images, you get 9 cinematic shots in one single generation. The character stays identical across all frames, same pose logic, same lighting mood, same visual style. This method is perfect when you want maximum camera variety quickly.
Example Prompt 1 (3×3 Cinematic Contact Sheet Prompt)
Perform a complete visual analysis of the uploaded image and identify all primary subjects (single individual, group/couple, vehicle, or object) and accurately interpret their spatial relationships and interactions within the scene.
Using only the identified subjects and the original environment, generate a cohesive 3×3 cinematic contact sheet composed of nine distinct camera shots.
Do not introduce new subjects, props, or environmental changes.
Adapt each cinematic shot type to the content:
• Keep groups intact and framed together
• Frame objects in their entirety when required
• Maintain logical spatial continuity across all frames
3×3 Shot Grid Specification
Row 1 - Establishing Context
1. Extreme Long Shot (ELS): Subjects appear small within the surrounding environment to establish scale and location.
2. Long Shot (LS): Full subject(s) visible head to toe (or wheels to roof for vehicles).
3. Medium Long Shot (MLS / American / ¾ Shot): Framed from knees up (people) or ¾ perspective (objects).
Row 2 - Core Coverage
4. Medium Shot (MS): Framed from the waist up (or central mass of object). Emphasis on action/interaction.
5. Medium Close-Up (MCU): Framed from chest up, intimate connection with subjects.
6. Close-Up (CU): Tight framing on face(s) or primary/front-facing surface of object.
Row 3 - Details & Angles
7. Extreme Close-Up (ECU): Macro focus on defining feature (eyes, hands, logo, texture).
8. Low Angle Shot (Worm’s-Eye View): Camera near ground looking upward.
9. High Angle Shot (Bird’s-Eye View): Camera above looking downward.
Continuity & Visual Consistency (Mandatory)
• Identical subjects across all 9 frames
• Same clothing, props, and physical details
• Same lighting conditions and time of day
• Realistic depth-of-field progression (more bokeh in closer shots)
• Unified photorealistic textures and cinematic color grading
Final Output Requirements
Produce a professional 3×3 cinematic storyboard grid:
• Top row: Wide environment → Full-body view → ¾ framing
• Middle row: Waist-up → Chest-up → Face/front close-up
• Bottom row: Macro detail → Low-angle → High-angle
Label each grid panel with the shot name (ELS, LS, MLS, MS, MCU, CU, ECU, Low Angle, High Angle) clearly displayed within safe margins.
Method 2: Story-Driven Cinematic Camera Control
The second method takes things further by focusing on story flow, not just angles.
How It Works
You start the prompt with a short story sentence, for example: “The man walks through the water, then launches his spear with deadly precision, striking the crocodile in a single powerful move.”
The AI then:
- Uses the same character and environment
- Generates a 3×3 grid where each frame progresses the story
- Creates logical shot transitions (wide → medium → close)
What the AI does
- Interprets the story
- Identifies the main subject and action
- Generates a 3×3 cinematic storyboard that visually tells that story
- Keeps the narrative flow logical from wide shots to intense close-ups
Why This Is Powerful
This method turns AI images into a ready-made storyboard.
Each shot feels intentional, perfect for:
- Cinematic shorts
- AI storytelling videos
- Action sequences
- Dramatic reels
You can even generate multiple outputs at once, giving you 18–27 usable shots in a single run.
Example Prompt 2 (Story-to-Storyboard Meta-Prompt)
Story: [The man strides through the water, then launches his spear with deadly precision, piercing the crocodile in a single, powerful strike.]
STORY-TO-STORYBOARD META-PROMPT
IMPORTANT: Do not create the image, create the detailed prompt for the image.
The image prompt must make reference to the story and reference image provided by user, the prompt must follow exactly the details of the image prompt.
When the user provides a short story synopsis, follow these steps:
Analyze the synopsis and identify:
- The main subject(s) (person, pair, group, creature, vehicle, object)
- Their appearance and defining traits
- The environment and tone
- The emotional or narrative beat
- Lighting/mood implied by the story
Create a full 3×3 cinematic storyboard grid with 9 distinct shots of the same subject(s) in the same environment, using consistent wardrobe, lighting, and atmosphere.
OUTPUT FORMAT
Cinematic 3×3 Storyboard Prompt
Story Synopsis (interpreted):
<one-sentence interpretation of the user’s synopsis>
Create a professional 3×3 cinematic storyboard grid featuring the same subject(s) from the synopsis in the same environment.
Maintain total consistency in appearance, clothing, lighting, mood, and environmental details.
Each panel represents a distinct camera shot following cinematic conventions.
Row 1 - Establishing Context
Extreme Long Shot (ELS)
Long Shot (LS)
Medium Long Shot (MLS / ¾ / American Shot)
Row 2 - Core Coverage
Medium Shot (MS)
Medium Close-Up (MCU)
Close-Up (CU)
Row 3 - Details & Angles
Extreme Close-Up (ECU)
Low Angle Shot (Worm’s Eye)
High Angle Shot (Bird’s Eye)
Global Requirements
- Same subject from the reference image in all 9 frames
- Same clothing, hairstyle, props, weapons, accessories
- Consistent environment and weather
- Correct realism and cinematic depth of field per shot
- Photorealistic textures
- Cinematic camera behavior and focal-length accuracy
- Label each grid panel with the shot name within safe margins
Extracting Individual Shots (The Smart Credit Saver)
One of the smartest tricks in this workflow is image extraction.
Instead of cropping manually, you simply:
1. Upload the generated grid image
2. Use a short prompt like:
- “Extract the still CU.”
- “Extract the still ELS.”
3. The AI isolates that exact shot for you
This allows you to:
- Pull only the shots you need
- Save credits
- Maintain maximum image quality
Turning Images into AI Video Clips
- Once you’ve extracted your shots:
- Switch to Video Generation in Keoo AI
- Upload the extracted image
- Choose a model (Google V3.1 or Kling 2.6)
- Set duration (5–6 seconds works best)
- Generate
Each image becomes a cinematic video clip with natural motion, depth, and realism. Combine multiple clips, and you’ve got a complete AI-generated cinematic video.
Best Use Cases for This Workflow
This one-prompt AI video system is ideal for:
- Cinematic storytelling videos
- Faceless YouTube channels
- AI short films and reels
- Instagram & YouTube Shorts
- Visual storytelling & concept trailers
You get professional results without cameras, actors, or editing software.
Final Thoughts
Full Camera Control in AI Video Using One Prompt (Nano Banana Pro + Keoo AI) proves that cinematic storytelling no longer requires massive budgets or technical expertise.
With structured prompts, a single reference image, and smart extraction techniques, you can create professional-quality AI videos that look intentional, cinematic, and story-driven.
If you want maximum creative control with minimum effort, this workflow is one of the most powerful AI video techniques available right now.
Disclaimer: This content is for educational and informational purposes only. The AI tools and workflows shown are for demonstration, and results may vary based on settings and updates. We are not affiliated with or endorsed by any platform mentioned. Always follow platform policies, copyright laws, and ethical guidelines when creating and publishing AI-generated content.